
APPS • DAILYTECH.ID - The process for customizing page margins in Google Docs is essential for professional document presentation, compatibility with standards like MLA or APA, and controlling how much white space surrounds the text. Controlling document margins allows users to effectively manage content flow and printing layout, regardless of the device being used.
To change margins in Google Docs on desktop, navigate to File > Page setup. In the Page setup dialog box, adjust the numerical values for Top, Bottom, Left, and Right margins (in inches or cm). On mobile, open the three-dot menu, select Page Setup, and manually input the desired margin measurements for the entire document. These detailed instructions will ensure you know how to adjust margins in Google Docs across every major platform and formatting requirement, allowing you to tailor your documents precisely.
Understanding Google Docs Margins and Layout Control
Margins define the empty space surrounding the printable area of your document. They are crucial for academic formatting (which often dictates a strict one-inch boundary), maintaining visual balance, and ensuring your content prints correctly without being cut off by the printer’s non-printable zone. When users search for how to change page margin in google docs, they are usually seeking the global setting that governs the layout for the entire document, which is managed through the Page Setup menu.
Google Docs operates fundamentally differently from traditional software like Microsoft Word because it is web-based and historically designed for collaborative simplicity. Unlike Word, which allows section breaks to apply varied margins within a single document, Docs applies margins uniformly to all pages in the document. Therefore, mastering the Page Setup panel is key to comprehensive layout control.
How to Change Margins in Google Docs on Desktop (PC/Mac/Chromebook)
The desktop web interface provides the most accurate and feature-rich environment for adjusting document dimensions. Whether you are using a PC, Mac, or Chromebook, the steps for how to change margins in Google Docs on computer utilize the same browser-based menu system, offering robust control over measurements and defaults.
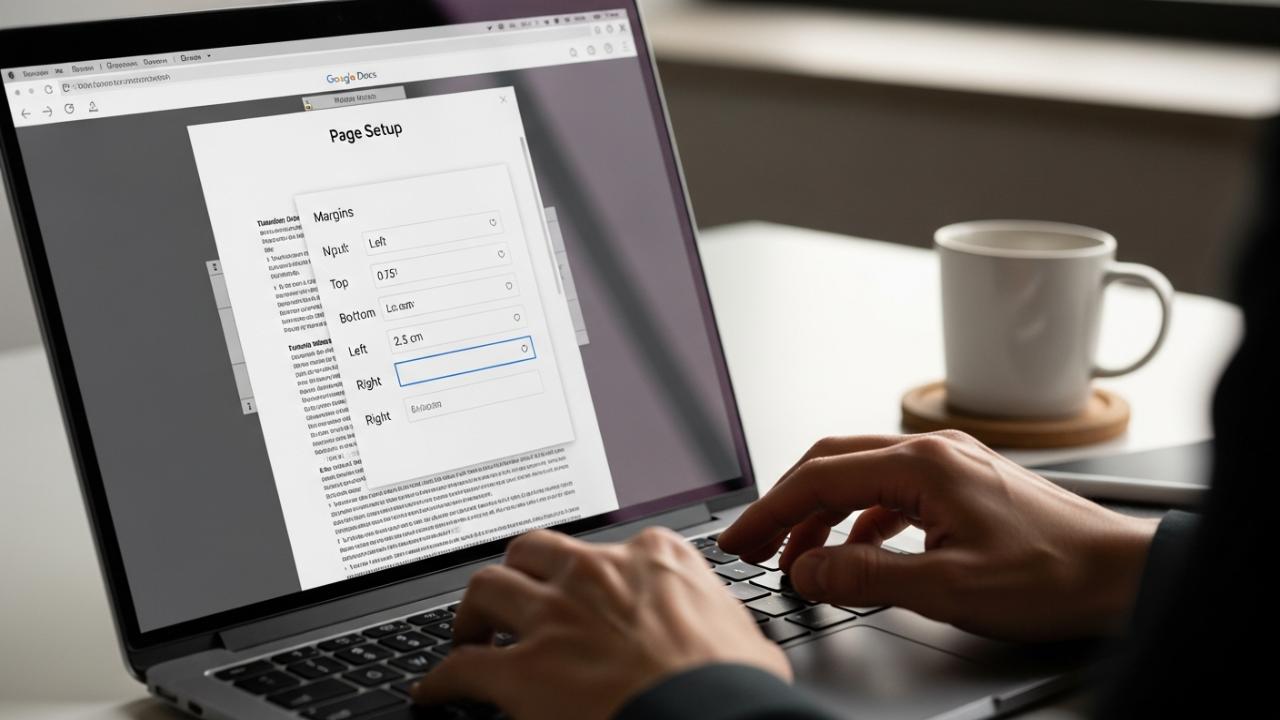
Method 1: Changing Margins Using the Page Setup Dialog
The Page Setup dialog box is the definitive command center for all layout changes, including setting the size of the paper, orientation, and, most importantly, the exact margin boundaries. This method is required if you need to adjust the top and bottom margins, or if you need precise numerical control.
- Access Page Setup: Navigate to the top menu bar and click File. Scroll down the dropdown menu until you find Page setup and click it.
- Locate Margin Controls: In the Page setup dialog box that appears, you will see four separate fields under the “Margins” section: Top, Bottom, Left, and Right.
- Input Measurements: Click inside each field and input the exact desired measurement. For users needing to meet specific standards, such as how to change margins in Google Docs to 1 inch for an MLA paper, you would input “1” into all four fields.
- Note on Units: Directly below the margin input boxes, confirm the measurement system being used (Inches or Centimeters). This is critical if you need to change margins in Google Docs to cm or adjust margin in Google Docs in cm.
- Application Scope: Ensure the “Apply to” setting is set to “Entire document” (which is the default and only option for margins in most cases).
- Apply Changes: Click OK to immediately apply the newly configured margins to every page of your Google Doc.
Method 2: Adjusting Margins Using the Ruler (Manual Left/Right Control)
For quick, visual adjustments to the horizontal boundaries, the ruler offers an intuitive alternative, though its capability is limited. This addresses how do I adjust margins in Google Docs quickly for the left and right sides.
- Verify Ruler Visibility: If you do not see a horizontal ruler above your document and a vertical ruler down the left side, go to View in the top menu and ensure Show ruler is checked.
- Locate the Margin Indicator: Look at the horizontal ruler. The margin is indicated by the gray area on the far left and far right ends. The boundary between the white (document text area) and the gray (margin area) is the clickable spot.
- Drag and Adjust: Hover your mouse precisely over the line separating the gray and white area. Your cursor will transform into a double-headed arrow.
- Drag: Click and drag the margin indicator to the left (to decrease the margin) or to the right (to increase the margin).
- Crucial Distinction: This method only changes the left and right margins in Google Docs. It does not offer any control over the top or bottom margins, nor does it provide the numerical precision found in the Page Setup menu.
Setting a New Default Margin (Persistence)
If you frequently create documents requiring non-standard margins (e.g., using narrow margins in Google Docs for high-density content, or setting all margins to 0.75 inches), you can save your current settings as the new permanent default. This simplifies future workflow.
- Open the File > Page setup dialog box.
- Configure your desired margins (e.g., Top: 0.5, Bottom: 0.5, Left: 0.5, Right: 0.5).
- Before clicking OK, click the Set as default button located near the bottom of the dialog box.
- Confirm the action. Moving forward, any new document you create will automatically adopt these margins, alleviating the need to continually reconfigure settings. This is the solution for how to change default margins in Google Docs.
Comprehensive Guide to Changing Margins in Google Docs on Mobile Devices
The need to format documents often arises while on the move. Fortunately, Google has integrated full margin control into its mobile applications. Whether you are seeking how to change margins in Google Docs mobile, using an Android phone, or trying to understand how to change margins in Google Docs on iPad, the process is nearly identical across all platforms utilizing the dedicated Google Docs app.
Steps for Changing Margins in the Google Docs App (Android/iOS/iPad)
While the mobile interface relies on touch input rather than desktop menus, the logical structure remains consistent.
- Open the Document: Launch the Google Docs app on your device (phone or tablet) and open the file you wish to modify.
- Access the Menu: Tap the three-dot menu (⋮) icon located in the upper right-hand corner of the screen. This opens the document settings menu.
- Navigate to Page Setup: Scroll down the resulting menu and tap Page setup.
- Select Margins: Within the Page Setup screen, tap the option labeled Margins.
- Choose or Customize: You will be presented with three standard options (Normal, Narrow, Wide).
- Narrow Margins: If you select “Narrow,” the app will automatically apply smaller margins (typically 0.5 or 0.7 inches) to the entire document.
- Customization: If the standard presets are insufficient, select Custom.
- Input Custom Measurements: In the Custom Margins screen, manually tap into the four fields (Top, Bottom, Left, Right) and input your desired numerical value. This is essential for users who need to adjust margins in Google Docs Android or iOS to meet strict academic guidelines.
- Note: The mobile app typically displays measurements in the unit set on the document’s desktop version (Inches or Centimeters).
- Save Changes: Tap the checkmark or ‘back’ arrow (depending on the device OS) to confirm and apply the new margins to your document. This answers the query how to change margin in Google Docs mobile app with precision.
Overcoming Mobile Limitations: Custom Margins and Precision
While the mobile app successfully allows you to change margins in Google Docs on phone, it lacks the visual ruler tool available on the desktop. Therefore, precision relies entirely on the numerical input in the Custom Margins dialog. Always double-check your input values when making adjustments in the mobile environment to ensure accuracy before submitting or printing the document. If extreme precision is required, it is best practice to finalize margin adjustments on a desktop interface where the ruler provides immediate visual feedback.
Specific Margin Requirements and Advanced Adjustments
Beyond the basic four-sided adjustment, users often require very specific margin configurations for specialized documents like theses, financial reports, or standardized academic submissions. This requires digging deeper into the settings to ensure compliance.
Achieving Standardized Margins (1 Inch, Narrow, Wide)
Many professional and academic contexts demand specific margins.
- Standard 1-Inch Margins: To change to one inch margins in Google Docs, simply enter “1” (or “2.54” if using centimeters) into all four fields (Top, Bottom, Left, Right) in the File > Page setup dialog. This is the universal standard for APA and MLA style guides.
- Narrow Margins: If the built-in narrow preset (typically 0.5 inches) does not meet your needs, you can set smaller custom values (e.g., 0.4 or 0.6 inches). Using narrow margins in Google Docs increases the amount of text visible per page, which is useful for printing efficiency or fitting content onto specific paper sizes.
Switching Measurement Units: Inches vs. Centimeters (cm)
International users or those working on metric projects frequently need to change margins in Google Docs to cm.
- Open File > Page setup.
- Configure your desired margin values (e.g., 2.54 for 1 inch).
- Find the unit selector dropdown menu, usually located next to the margin input fields (or sometimes in the General Settings under File).
- Change the selection from “Inches” to “Centimeters.”
- Google Docs will automatically convert your existing input values to the metric equivalent. For example, a 1-inch setting will immediately display as 2.54 cm, solving how to adjust margin in google docs in cm.
Adjusting Header and Footer Margins Separately
It is a frequent requirement to control the space reserved for the header and footer relative to the page edge, independent of the main document text block. This is often misunderstood as adjusting the main top/bottom margin, but it is a separate setting.
- Open File > Page setup.
- Scroll down within the dialog box below the main Margin fields.
- Locate the section titled Header and Footer.
- Here, you can specifically set the distance from the edge for both the header and the footer. If you need to change header margins in Google Docs, adjusting the “Header distance from top” value will move the header content closer to or further away from the physical top edge of the page.
- Note: While the main text block starts where the Top Margin dictates, the header content starts where the Header Margin dictates. Ensure the Header distance is less than the Top Margin value, otherwise the header content might overlap with the main body text.
Margin Control in Tables, Images, and Text Indentation
It is important to differentiate between global page margins and localized content formatting. If you are struggling with spacing inside a table or around an image, the page margins (Page Setup) will not help.
- Table Margins: To change margins in table in Google Docs, you must adjust the cell padding or cell spacing within the Table Properties menu (Right-click the table > Table properties). This controls the internal white space within the table elements, not the page boundary.
- Text Indentation (Bullet Margins): If only a specific paragraph or list needs its alignment adjusted—such as moving bullet points closer to the edge—you must use the Indentation controls. These are found on the horizontal ruler (using the triangular indent markers) or via Format > Align & indent > Indentation options. These adjustments manage the boundaries of the text block within the page margins, allowing you to simulate different margin styles for specific sections.
The Pageless View Exception: Adjusting Text Width
For users who have switched their layout format, understanding how to change margins in pageless Google Docs is crucial. The Pageless format removes fixed page breaks and margins designed for printing, optimizing the document for screen reading.
- If your document is set to Pageless (File > Page setup > Pageless), the standard margin inputs are ignored.
- Instead, control the viewing width by going to View > Text width.
- You can select Narrow, Medium, or Wide. Selecting Narrow will create the largest amount of white space on the left and right sides, mimicking extremely wide margins, whereas selecting Wide maximizes the content area. This controls the readability and flow but is not a fixed, measurable margin adjustment.
Troubleshooting Common Margin Issues in Google Docs
When margin adjustments don’t behave as expected, it’s typically due to confusion between global settings, local formatting, or viewing settings.
Why Margins Won’t Change for a Single Page
A common frustration stems from the lack of native section breaks in Google Docs. While users search for how to change margins in Google Docs for one page, the software mandates that the margin settings in Page Setup apply to the entire document. To visually isolate different margin requirements for print, your only solution is to apply text indentation to the specific content on that page, shrinking the content area without changing the actual page margin boundary. Alternatively, the content must be placed in a separate Google Doc file with its own margin settings.
Resolving Ruler Visibility and Functionality Problems
If the ruler is not showing or if you are unable to drag the margin indicators to change left and right margins in Google Docs, perform these checks:
- Ruler Visibility: Ensure View > Show ruler is checked. If it is unchecked, the rulers and their margin adjustment tools are hidden.
- View Mode: If you are in “Viewing” or “Suggesting” mode (checked under the pencil icon near the top right), you cannot edit layout elements. Switch back to Editing mode.
- Browser Zoom: Occasionally, extreme browser zoom settings can interfere with the precision needed to click and drag the narrow margin boundary markers. Resetting your browser zoom level to 100% can often resolve this usability issue.
FAQs – How To Change Margins In Google Docs
Google Docs applies margin settings globally to the entire document, unlike word processors that support section breaks. You can simulate different margin layouts for a single section by using text indentations or by copying the content into a new document with distinct margin settings.
You can switch the measurement unit by going to File, selecting Page setup, and changing the drop-down menu under the margin input boxes from “Inches” to “Centimeters.” This will automatically convert your existing settings to the metric scale for precise adjustments.
If the ruler is not visible, navigate to the View menu at the top of the Google Docs interface and ensure that Show ruler is checked. Once visible, you can use the gray boundaries and white text areas to visually adjust the left and right side margins.
Top and bottom margins can only be adjusted through the File > Page setup dialog box by entering specific numerical values for the upper and lower fields. The manual ruler tool is strictly limited to horizontal adjustments for the left and right margins only.
Yes, you can change margins in the Google Docs mobile app on Android, iPhone, and iPad by accessing the three-dot menu (⋮), selecting Page setup, and then choosing the Margins option to enter your required custom sizes or use presets.


