
APPS • DAILYTECH.ID - The Promotions tab in Gmail can quickly become a digital graveyard for thousands of forgotten newsletters, expired deals, and old marketing messages, silently consuming gigabytes of your valuable storage space. While designed to keep your primary inbox clean, this automated folder requires regular maintenance to prevent it from becoming a major source of clutter and a drain on your account’s resources. Learning how to delete promotions in Gmail in bulk is a simple, satisfying process that can instantly reclaim storage and restore a sense of order to your inbox. If you want to learn more about managing your Gmail account effectively, check out the full guide on Gmail Guide: How to Create, Manage, and Secure Your Account.
What is the Promotions Tab and Why Does It Get So Full?
To effectively manage the Promotions tab, it’s helpful to understand what it is and how it works. Gmail’s tabbed inbox system, introduced in 2013, was designed to automatically categorize incoming mail to help users prioritize their attention.
How Gmail’s Algorithm Curates Your Inbox
Using machine learning, Gmail analyzes incoming messages and sorts them into default categories:
- Primary: Personal conversations, direct messages, and other emails that don’t fit into the other categories. This is your main, high-priority inbox.
- Social: Notifications from social media platforms like Facebook, X (formerly Twitter), Instagram, and LinkedIn.
- Promotions: This is the designated folder for all marketing emails, special offers, newsletters, deals, and other bulk commercial mailings.
The algorithm is incredibly effective at identifying these types of emails, which is precisely why the Promotions tab can grow to an unmanageable size so quickly.
The Hidden Storage Hog
Every free Google Account comes with 15 GB of storage, but this is shared across Gmail, Google Drive, and Google Photos. The Promotions tab is often the biggest culprit for consuming your Gmail storage for several reasons:
- High Frequency: Retailers and marketers often send emails on a daily or weekly basis.
- Image-Heavy Content: Most promotional emails are not plain text; they are rich HTML messages filled with images, graphics, and tracking pixels, which makes each email larger than a simple text message.
- “Set it and Forget It” Subscriptions: It’s easy to subscribe to a newsletter for a one-time discount and then forget about it, allowing thousands of unread emails to accumulate over the years.
A Promotions tab with 20,000 unread, image-heavy emails can easily take up several gigabytes of your storage, which could be the difference between a functioning account and one that can no longer receive new mail.
Is It Safe to Delete Everything in Promotions?
For the vast majority of users, the answer is a resounding yes. The content in the Promotions tab is almost always non-essential. These are not personal conversations or critical documents. However, before performing a massive deletion, it’s wise to take a 60-second precaution:
- Quickly scan the first page or two of the Promotions tab.
- Look for any miscategorized emails. Occasionally, a shipping confirmation, a receipt, or a newsletter you genuinely value might be incorrectly sorted.
- Drag any important emails to your Primary tab. This not only saves them from deletion but also helps train Gmail’s algorithm to categorize future messages from that sender correctly.
Once you’ve done a quick check, you can proceed with the deletion, confident that you are only removing digital clutter.
The Definitive Guide: How to Delete All Promotions in Gmail
This bulk-deletion process is powerful and can remove tens of thousands of emails at once. It must be performed on a desktop web browser, as the Gmail mobile app does not have the necessary “select all” functionality.
Step 1: Navigate to the Promotions Tab
Log in to your Gmail account on a computer. At the top of your inbox, you will see your category tabs (Primary, Social, Promotions, etc.). Click on the “Promotions” tab to isolate and view only the emails in that category.
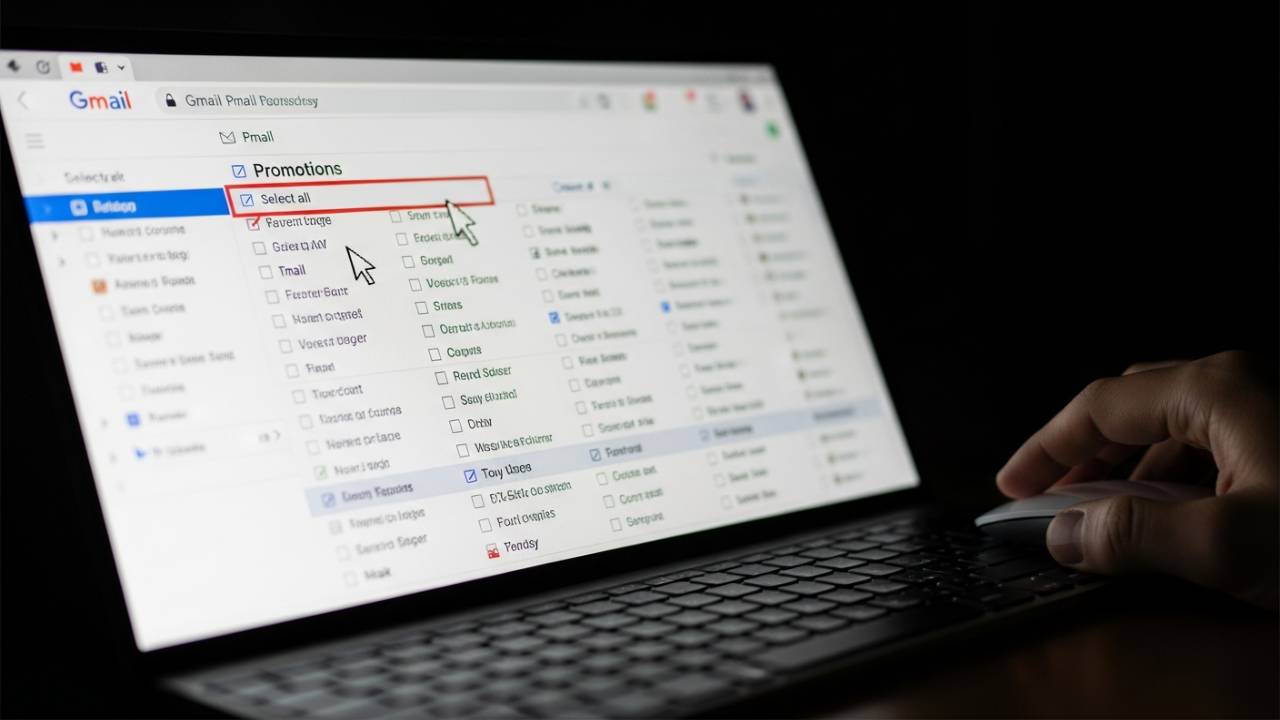
Step 2: Select All Promotions on the First Page
At the top-left of the email list, just below the main search bar, you will see a single selection checkbox. Click this checkbox. This action will select all the promotional emails that are currently visible on the first page of the tab (typically 50 or 100 conversations).
Step 3: The “Select All Conversations” Magic Link
This is the most important step in the entire process. After you’ve selected the first page of emails, a new notification bar will appear at the top of the list. It will read, “All 50 conversations on this page are selected.” Immediately next to that text, you will see a blue, clickable link that says:
“Select all conversations in Promotions.”
You must click this blue link. This is the command that tells Gmail to expand your selection from just the first page to every single conversation in the entire Promotions tab. After clicking it, the notification text will change to confirm your action, stating, “All conversations in Promotions are selected.”
Step 4: Click the Delete Button
With every promotional email now selected, move your mouse to the toolbar above the email list and click on the trash can (Delete) icon.
Step 5: Confirm the Bulk Action
Because you are about to delete a potentially huge number of emails, Gmail will display a “Confirm bulk action” pop-up window. This is a final safeguard to prevent accidental deletion. The pop-up will warn you that this action will affect all conversations in the Promotions tab.
If you are certain you want to proceed, click the blue “OK” button.
Gmail will now begin moving all the selected emails to your Trash folder. This may take anywhere from a few seconds to several minutes, depending on the size of your Promotions tab. You will see a black notification box at the bottom-left of your screen that says “Moving conversations to the Trash…” Once it’s done, your Promotions tab will be empty.
Beyond Deletion: How to Keep Your Promotions Tab Under Control
Deleting all your promotions is a great reset, but to prevent the problem from recurring, you need a proactive strategy.
The Power of the “Unsubscribe” Button
The single best way to keep your Promotions tab clean is to stop unwanted emails at the source. Before you perform a mass delete, take five minutes to scroll through the first few pages and aggressively unsubscribe from any newsletters or marketing lists you no longer read.
Gmail makes this incredibly easy. At the top of most marketing emails, right next to the sender’s name and email address, Gmail provides a prominent “Unsubscribe” link. Clicking this is much more effective than simply deleting the email, as it sends a formal request to be removed from the sender’s mailing list.
Teaching Gmail’s Algorithm
If you find an important email in the Promotions tab that should have been in your Primary inbox, you can easily correct it.
- Click and hold the email.
- Drag it from the Promotions tab list and drop it onto the “Primary” tab label.
- A yellow notification will appear at the bottom of the screen asking, “Do this for future messages from [sender’s email address]?” Click “Yes.”
This action teaches Gmail your preferences, making it more likely that future emails from that sender will be categorized correctly.
Putting It All Together for a Full Cleanup
To get the maximum benefit, you should combine the deletion of your promotions with other cleanup tasks. After you clear your Gmail promotions tab, those thousands of emails are now sitting in your Trash folder, still taking up space for 30 days. For a complete cleanup, you should also consider a wider mass delete of other old emails and, most importantly, empty your trash to immediately reclaim your storage.
Learn more in our full guide:
– How to Mass Delete Emails in Gmail
– How to Empty Gmail Storage
Frequently Asked Questions About Deleting Promotions
No. The official Gmail apps for Android and iOS do not have the “Select all conversations” feature. You can only select and delete emails one by one or screen by screen, which is not practical for thousands of messages. The bulk deletion process must be done in a desktop web browser.
Not immediately. When you first delete the emails, they are moved to the Trash folder. They will stay in the Trash for approximately 30 days before Google permanently deletes them. During this 30-day window, you can go into the Trash folder and recover an email if you deleted it by accident.
Unsubscribing should stop all marketing and promotional emails. However, it will not stop transactional emails, such as order confirmations, shipping notifications, or password reset emails, which you would still want to receive.
If you prefer a single, unified inbox, you can disable the category tabs. Go to Settings > See all settings > Inbox. In the “Categories” section, uncheck all the boxes except for “Primary.” This will cause all emails to be delivered to your main inbox again, but you will lose the automatic sorting feature.
As long as it has been less than 30 days and you have not manually emptied your Trash, you can recover it. Click on the “Trash” folder in the left-hand menu, find the email, select it, and use the “Move to” icon (a folder with an arrow) at the top to move it back to your inbox.
Conclusion: Reclaim Your Storage and Focus with a Clean Promotions Tab
The Promotions tab is a useful feature for reducing distractions in your primary inbox, but it is not a “set it and forget it” solution. It requires regular maintenance to prevent it from becoming a massive, unorganized archive that consumes your storage. Learning how to delete promotions in Gmail in bulk is a simple, high-impact digital cleanup task that can be completed in under a minute. By making this a part of your routine—perhaps once every few months—you can ensure your Gmail account remains lean, organized, and ready for what’s truly important.


